Showing posts with label decor. Show all posts

1.10.2012

{tutorial} Upholstered Headboard Squares

First I have to apologize...as I was knee-deep into my project I realized I had not taken any photographs with my camera so I pulled out my iphone and snapped a few blurry shots.  I wish the quality was better, but it is what it is.
After seeing this headboard on DIY Network webpage I immediately went into action to create my own little version.  Once I had collected everything I needed in order to finish this project it came together relatively quick.  Needed for this headboard project is:  Styrofoam Mattress Pad, Scissors, Upholstery Batting, Staple Gun, Wood Squares, Fabric, Wood Particle Board, Hammer, and Screw Gun.

 Please keep in mind this headboard is for a full-size bed so all dimensions stated are for such size.  I bought the wood at Lowes and since we moved to NM we don't have access to my father-in-law's tools so I had the man at Lowes cut the board into twelve 13.5" squares.  Did you know Lowes doesn't charge for such cuts? I was certain it was going to cost an arm and a leg, but nope it was free and fast!
First I cut the mattress pad into twelve 13.5" squares.  As for the batting I just eye-balled it.  When cutting the batting I made sure to leave a 4" over hanging border so it could wrap around easily for stapling.  I also cut my fabric using the same dimensions I used for the batting.  Next, I just stapled around the edges making sure to pull tightly.  If you don't pull tight on the fabric and batting it will pucker and look sloppy.  And nobody likes a sloppy headboard, right?

 The corners were a bit tricky because of the batting thickness.  I found that folding the left side in and then the top over that made the cleanest fold.
Tip:  If your staples don't go all the way in take a hammer and pound them down into the wood.
After all boards are upholstered I screwed them tightly into a board from the back.  This is were a friend or significant other comes in handy.  Four hands really are better than two sometimes.  I wanted the boards to be butted up against each other as tight as they could go, so my hubby screwed from behind while I pushed the boards together from the front.  Once all boards are screwed in place just lean against the wall behind the bed-- this helps keep the headboard in place.
Just FYI-- we tried a couple of wall mounting methods.  Our first fail was double sided sticky pads, but let's be honest they held for maybe 5 minutes.  Our second fail was hanging each individual board with saw tooth metal picture hangers, but we couldn't get the boards close enough together.  Also, with the hanging method the boards could easily fall off on the guests when they were leaned against, so this was a BIG FAIL!
Perfect for my guest bedroom and the many holiday guests we had joining us.

11.21.2011

{free printable} Thanksgiving Door Wreath & Sign

I'm all about quick crafts!  I usually do them during the kiddo's naps and this wreath was one of those super quick, but cute crafts I took on this past week. 
I used some scrap chenille fabric I had left over from some bibs I made 4 years ago.  I was just waiting for the perfect project and this was it.  However, I used so little that I still have plenty left over. :)  I created this flower with 4 circles, embroidery floss in an alike color, and a needle.  The center circle was rolled up and sewn like a rose.  Then I folded the remaining circles into fourths and sewed them willy nilly onto the rose until I liked the look.  The green leaves were simply sewn with my machine and trimmed down with scissors.  The nice thing about chenille is that it's rustic and your lines don't have to be perfect.
After I was done attaching the flowers with wire I felt the wreath a little too plain so I created this sign and mod podged it onto a painted wooden board.  I then attached the ribbon with staples onto the back.  So simple, I tell ya.
The sign in the picture was printed at Staples and I had them enlarge it to fit the size of board I had laying around.  If you want to do the same just right click on the above image and save to your computer.
So if you'd like to adorn your door or wall with this last minute "Give Thanks" sign, feel free to download HERE.  Happy Turkey Day!

10.13.2011

{tutorial & free printable} Halloween Burlap Wreath

These burlap wreaths are popping up all over the internet, but I specifically found inspiration at Craftaholics Anonymous to make mine.
I've seen most burlap wreaths made with wire hangers bent into a circle, but I chose to use a wreath form.  However, the green would definitely poke through so I needed to paint mine black first.
I used basic craft paint, but I suppose if you had black spray paint laying around that would work too.
While the paint is drying, lay out your burlap and cut 1x18 inch strips of fabric.  I chose to make mine a bit longer than other tutorials because the wreath form is thicker than a wire so it requires more fabric to wrap around.
I cut strips from approximately 3/4th of a yard of fabric and that seemed plenty for my wreath, but if you like a more fuller look I would purchase at least a yard of burlap to be safe.

 Just as I was about to begin wrapping my wreath with fabric I looked down to see black paint splatters all over my shirt.  What can I say I'm a messy crafter, but if anyone has any tips as how I could remove paint splatters from a shirt please send them my way.  Back to the wreath-- just tie knots of fabric around your wreath until your satisfied with the fullness.  Make sure NOT to pull too tight on the burlap when knotting-- it's very sensitive and will break with just a little amount of strength.  I then attached this little crow I found at the dollar store with some super glue and wire.  Now your wreath is ready to hang.  I paired mine with this little "trick or treat" sign I had laying around, but you could hang your wreath with my printable file below.  All you would need to do is mod podge it onto some wood or tin and string with some burlap or ribbon.

To download your own "Trick or Treat" sign go HERE
Total Cost of the Project: $8
Wreath Form (Joanne's Fabric with 50% off coupon): $4
1 Yard of Black Burlap Fabric (Joanne's Fabric with 40% off coupon): $3
Black Crow (Dollar Store): $1

7.13.2011

{free printables} Lemonade & Sweets Stand

While visiting my family in Utah this last month I saw a zillion lemonade stands and I got to thinking how cute it would be to have printables for just that.  Afterwards I went home and started googling it and discovered I'm not the only one that has thought of this.  So I started making these printables and then I sat on them for almost a month because I wanted to take pictures of them in use.  During that time, more lemonade stand printables became available online, but oh well... I still think mine are super cute and run with the best of them. :)
I had every intention of putting some yellow jelly beans in these cupcake wrappers, but when I went to the cupboard to get them, to my surprise they had disappeared.  Hmmmm... I thought my husband said he was on a diet? ;)
The LEMONADE/SWEET STAND printables include:  road sign with arrows, tented food labels (some with wording some without), lemonade banner, price toppers/stickers, drink tags and 3 coordinating digital papers.
Attach this sign to a yard stick with the arrow pointing the correct direction to drive in the traffic.  To add a little frill you can always add some tule or ribbon on the stick.
Place these tented cards next to all of your homemade baked goods.  Also you could cut the top piece off and stick them directly on your baked packaged goods.
"LEMONADE" banner-- I envision this strung together with  yellow tule to give a bit of a frilly feminine touch.
Use these digital papers to make paper chains, paper flowers, and/or paper pinwheels to dress up your stand.  Possibilities are endless.
Tape these price toppers to a lollipop stick and place in whatever sweetness you bake up.  Also, these drink flags will make just the perfect touch to your delicious and refreshing lemonade.
I wish I had gotten these out sooner, but hey we still have close to 6 weeks left of summer and there are still a plethora of hot days calling for our kidlets to get out there and sell refreshing lemonade and make a buck or two in the meantime. 
EMAIL ME FOR THE PDF-- Scribd is acting weird right now!
kirstenfuller{at}gmail{dot}com

6.05.2011

{giveaway contest} Bug Printables-- CLOSED!

I'm in LOVE with these bug prints!  I was inspired to make these prints from the fabric I chose to make my son's birthday banner.  The bright colors are so fun.  Too often, when looking for bug printed stuff you will find loads of ladybugs, butterflies and/or bees, but I wanted something different.  I think this fabric and the wall prints would make a DARLING nursery, playroom or young child's bedroom.  Even if you don't have kids at home, this would make a cute gift!
 
So... I'm giving these prints away to one lucky commenter! 
To enter the giveaway contest please leave a comment (with your email address) and let me know what type of party printables you wish I would make available on this site.  Winner will be chosen at random with a number generator.  Who knows maybe I will get some inspiration from your comments and your wish will be granted. :)

Contest will close at midnight on Sunday, June 12th
CONTEST CLOSED

WINNERS-- all three commenters received the printables.  THANK YOU ladies!

Interested in purchasing these prints, visit my ETSY site.

4.18.2011

{free printable} Celebrate Earth Day!

Celebrate Earth Day with this "i heart the Earth & trees" print. I realize that printing something for one day actually goes against what Earth Day is all about so why not print it on recycled paper and leave it up year 'round as a reminder to be kind to Mother Earth? Maybe it will help remind us to recycle or carpool, who knows?

In commemoration of Earth Day (April 22nd) I've also put together some fun activities we could do with our kids. Who says Earth Day can't be Everyday? Enjoy.

4. Have each child plant their own tree/plant
5. Make recycling bins and sort out the trash (hmmm... stay tuned...I think I may have to make some recycling printable labels)

You may download the print HERE

4.17.2011

New Kitchen Printables on Etsy!

New Kitchen Wall Printables added to my Etsy shop!

You can customize the color background to match your kitchen. I'll even trade out the wording, vegetables and fruits if you desire. Go on over and check it out HERE.

10.26.2010

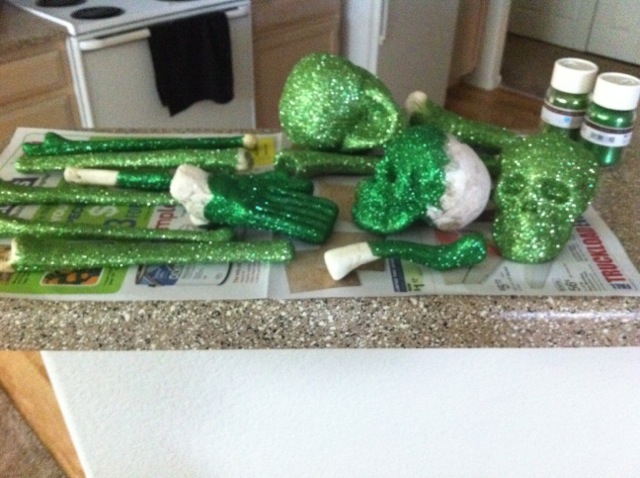
Glitter Skulls

I hate glitter. Let me rephrase that-- I HATE GLITTER! So usually you would not find me anywhere near it in the craft store let alone in my own home. However, Martha Stewart inspired me and helped me get past my absolute hatred for this versatile craft supply.

Michaels again supplied all needs for this craft project. My mother-in-law helped me with these while she was in town and if it wasn't for her gentle prodding I'm not sure I would have actually gotten them done. All we did was paint Mod Podge glue onto the skulls and cover in two shades of green glitter.

They're no Martha Stewart quality, but I'm glad I branched out and did it. Who knows, maybe this has turned a new page in my book towards glitter. Maybe. Just maybe.

Skeleton Leaf Pictures

I saw some beautiful skeleton leaf prints back in Utah and I wish I had bought them while I was there, but being impatient I decided to try my hand at my own art. Now, you can actually make skeleton leaves yourself and the process is rather easy. I'll post that below at the end, but these are actually from my local Michaels craft store and for $3.59, plus the frames (which were 40% off), I did this entire project for less than 35 buckarooskies.

Seriously the easiest thing I've ever done. All I did was cut the paper to the right size of the frame, place the leaves in the order I wanted them and dabbed them with a sponge brush of mod podge. SO EASY.

They turned out better than expected! Boy do I love Mod Podge.

How to make your own skeleton leaves:

There are actually a few ways to make skeleton leaves, but I think this is probably the easiest and doesn't force you to go out and buy anything weird in order to make them. All you need is water and bleach. You want to pick waxy type leaves that are a bit more sturdy. I've heard that maple leaves turn out the best and are the easiest for beginning skeleton leaf makers. :) First you'll want to clean off the leaf and then soak it in a really strong bleaching solution until it turns white. Remove the leaf from the bleach and rinse it--- being very careful to not break it. If needed, you can remove any excess pulp from the leaf by using a stiff-bristled paint brush. At this point your leaf will be colorless, but you can dip the leaf into food coloring or other coloring agents to get whatever color you desire. Then lastly, you must let the leaf dry completely before using it in whatever craft project you desire. Happy skeleton leaf making!

Candlesticks

I was having a hard time finding a pair of candlesticks that I really liked the color and shape of so I decided to make do with what I could find. These candlesticks were $5 each at TJ Maxx and the spray paint was a few bucks at Lowes.
I always forget how much overspray comes from spray paint cans. I really should have done it on the lawn rather than our porch. It left a good mark there for future tenants.
I loved how they turned out. The pictures don't do it justice because quite frankly I'm too lazy to get out our nice camera to take pictures so these are from my phone.
Such a quick and easy fix. I'm sure I'll be using this technique again in the future, but only next time outside on the grass or rocks.

LinkWithin

Related Posts Plugin for WordPress, Blogger...