Showing posts with label mod podge. Show all posts

5.21.2012

{free printable & project share} Homemade Sugar Body Scrub

I know I always appreciate  homemade gifts, especially on Mother's Day, so this  year I decided to do baskets for the moms with multiple homemade goodies.  Sorry I'm posting this after the fact, but just in case my mother and mother-in-law check this blog I didn't want to ruin the surprise.  Anyway, this lavender sugar scrub is just one of the things debuting in the basket and it took less than 1 minute to pull together.  Now that's my type of craft!
Ingredients Needed:
  •  Sugar (I used granulated white sugar, but I suppose brown could work too)
  • Oil (I used almond oil, but any oil that is smell-less would work-- such as olive oil)
  • Essential Oil Drops
  • Glass Jar
First fill your jar with the sugar, but leave enough room for the oil.  I used just enough oil that when it was mixed together it was a sloshy, but not too oily (does that make sense?).  It's not a science-- just pour the oil in a little at a time until you're satisfied with the dampness of the sugar mixture.
 Now, add between 5-10 drops of essential oil.  I used lavender, but contemplated using peppermint, orange, vanilla....etc.  I bought this lavender essential oil at Hobby Lobby and it was the most costly part of this project.  BUT, it should last me a while because you don't need much.
Next, tie it up with a pretty ribbon, a wooden stick and my free printable.  I would also encourage you to Mod Podge the printable label onto your glass jar so when it gets wet it doesn't sog up and fall off.
 I've created an assortment of four body scrub labels for you.  These body scrubs are super fast to put together-- the perfect last minute gift for just about anyone.

2.28.2012

{free printable & project share} How Do Dinosaurs?... Book Popsicle Stick Puzzles

I'm pretty sure every mother to young boys has heard of these "How Do Dinosaurs..." book series, but if you haven't click on the book picture below and go check them out.  They are apart of our nightly ritual-- sometimes they are an all day phenomenon.  My kids LOVE them.  So much we've had to purchase this particular book (see below) 3 times because the pages began to fall out.
So... because they are a fave in our house, I thought it appropriate to use these book's pictures on my popsicle stick puzzles.  I googled these books and found a gazillion pictures online to print at home.  I'm not sure if it's illegal or not-- anyone know?    However, you could also use pictures from any old book you have laying around.  After I did this I thought to myself I could have used one of those other books with the pages falling out and that would have worked great too!

The puzzle sticks were a super quick craft and was achieved in one afternoon's nap time.  I used jumbo popsicle sticks and these pictures were cropped and sized just right for them.  I highly encourage the use of your own books, as I've been told as of lately that using pictures from the web and printing them infringes on copyrights.
The number stickers were an after thought, but I think they'll be nice to have when it comes time to teach the little ones their numbers and their order.

 My three year absolutely LOVES them and has asked to play with them for the past few days straight.  It's always great when you can take your child's favorite book and make it come alive for them.  Such a darling book series--recommend checking them out at the library OR buying them for your own library collection.  They are a fave in our family!

5.09.2011

{free printables & tutorial} Garden Herb Sticks

I've had these wooden craft sticks laying around for quite sometime waiting for them to inspire me. This past week I finally decided to put them to use by making garden herb planter sticks.
{Please ignore my stubby thumbs. I was once told by a little girl at a camp I was working at that they were a Jewish trait called, "Oshinazi Thumbs." Not sure if I should believe her. Whether they're Jewish or not, they're stubby. I've grown to like them.}

Enough about my thumbs. Onto the sticks! Sometimes I get a little ambitious and pot too many herbs to keep track of. I find it difficult to tell the difference between thyme and oregano, so I created these HERB PRINTABLES to give me a hand. It also adds some color to your potted herbs. Living in New Mexico, the landscape here is mostly tints of browns so anything that adds a punch of color I'm all about. PLUS, if you have unique herbs planted in your garden those are sometimes hard to pick out.


10.26.2010

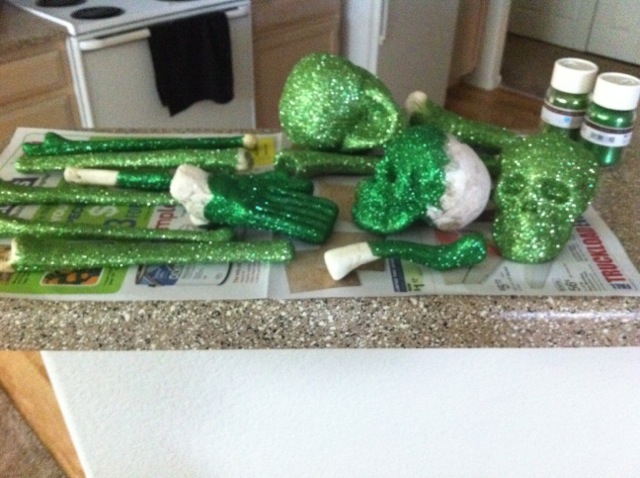
Glitter Skulls

I hate glitter. Let me rephrase that-- I HATE GLITTER! So usually you would not find me anywhere near it in the craft store let alone in my own home. However, Martha Stewart inspired me and helped me get past my absolute hatred for this versatile craft supply.

Michaels again supplied all needs for this craft project. My mother-in-law helped me with these while she was in town and if it wasn't for her gentle prodding I'm not sure I would have actually gotten them done. All we did was paint Mod Podge glue onto the skulls and cover in two shades of green glitter.

They're no Martha Stewart quality, but I'm glad I branched out and did it. Who knows, maybe this has turned a new page in my book towards glitter. Maybe. Just maybe.

Skeleton Leaf Pictures

I saw some beautiful skeleton leaf prints back in Utah and I wish I had bought them while I was there, but being impatient I decided to try my hand at my own art. Now, you can actually make skeleton leaves yourself and the process is rather easy. I'll post that below at the end, but these are actually from my local Michaels craft store and for $3.59, plus the frames (which were 40% off), I did this entire project for less than 35 buckarooskies.

Seriously the easiest thing I've ever done. All I did was cut the paper to the right size of the frame, place the leaves in the order I wanted them and dabbed them with a sponge brush of mod podge. SO EASY.

They turned out better than expected! Boy do I love Mod Podge.

How to make your own skeleton leaves:

There are actually a few ways to make skeleton leaves, but I think this is probably the easiest and doesn't force you to go out and buy anything weird in order to make them. All you need is water and bleach. You want to pick waxy type leaves that are a bit more sturdy. I've heard that maple leaves turn out the best and are the easiest for beginning skeleton leaf makers. :) First you'll want to clean off the leaf and then soak it in a really strong bleaching solution until it turns white. Remove the leaf from the bleach and rinse it--- being very careful to not break it. If needed, you can remove any excess pulp from the leaf by using a stiff-bristled paint brush. At this point your leaf will be colorless, but you can dip the leaf into food coloring or other coloring agents to get whatever color you desire. Then lastly, you must let the leaf dry completely before using it in whatever craft project you desire. Happy skeleton leaf making!

LinkWithin

Related Posts Plugin for WordPress, Blogger...